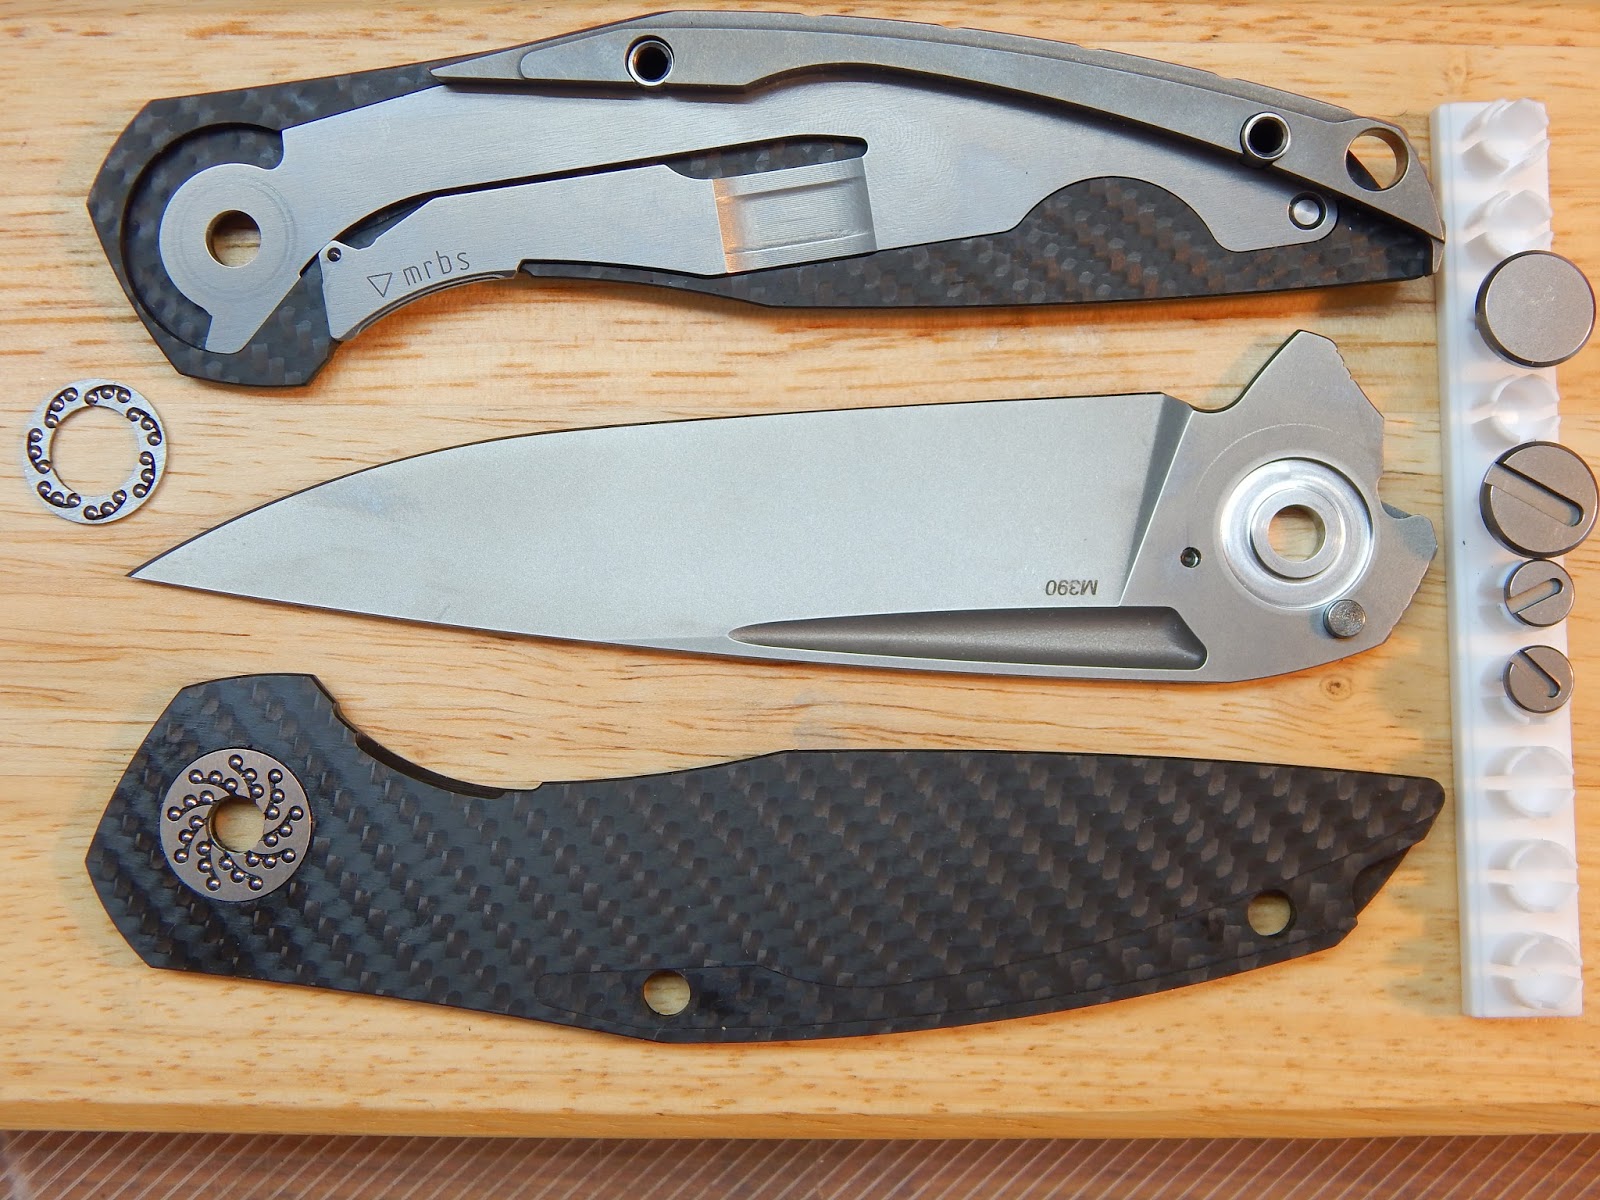
Always suspected its an internal stop pin for the lack of an external visible one on this knife, the 100 piece collaboration, Tetra. But a pivot bushing! Wow! I certainly didn't expect that.. For all the Shirogorov I had.. this would be a first with such an assembly.. I was aware some of their knives were with bushing but never knew all the specific ones.
Next came the washer.. hmmm funny shape with a cutout.
Simple enough to put it back eh... or so I thought... and good thing I have not 1 but 2 of those club shaped bits... to help counter torque as things start to tighten...
Some knives behave nice and will simply
center upon pivot and back screws being assembled back without much fuss. afterwhich it is just a matter of fine tuning the pivot tension right. Anymore desired will most likely need a tweak to lock bar tension or mucking with detent ball and tracks etc.
Some knives are more finicky and centers well only when assembled in an open position
Only problem was no matter which way I try, there is a horrible amount of play of the blade between the handles when screw was already tight and there is no way to over tighten with a bushing assembly.
Tried doing it with blade close, open in locked up position and open with lock pushed aside like in pic.. in a bid to keep blade centered before screwing in to tighten
Zilch -- and the blade will stay rubbed on non lock side as the lock pushes against it when closed.
Troubleshooting:
(a) washer is worn too thin and bushing is extended now as a result?
(b) over clamped when in the vice?
(c) washer somehow was dropped away from pivot hole when assembling?
Nope.. all was good and only lightly slotted the backend on the vice., hardly any pressure at all?
The play...
about to give up... thinking of the worse scenario is finding a way to send it back to factory... Something that I really dread.
Break!
Came home and took it apart again.. then I started to think if the cutout bit on the washer means it has to be fitted in a specific position.
Place them on and turn. Bingo! the Cut out fits nicely to the stop pin. As I slowly move the blade.. the entire washer is now rotating. Something that just doesn't happen with most washer knives!
Proceeded to put everything back together with the washer cut out positioned against the stop pin and tighten.
Bingo! Knife was back in order. Almost perfect and "self centering" as pivot tension kicks in.
As what was mentioned somewhere, bushing system can't be overtightened. The adjustable range of the pivot tension is really narrow after the full assembly but yup, everything is back in order now.
Did this awhile back, not long after getting the knife but forgotten all about it. There really wasn't a need as everything was quite smooth. Lke most of my blades, it's a matter of trying to get them to where I want with the movements of it's actions... nothing really of practical value in doing them but as knifenuts... oh well. :)
This certainly requires a special tool...
... which fortunately came with the knife.
And who would have thought.. my 30 yr old rifle cleaning kit came into play too
The bit part is a pretty snug fit. However due to the overall shape, it could potentially slip if a "lever" is not secured in the hole... the cleaning rod was a good fit and with an entire hand grabbing, twisting the screw open without excessive stress on the pivot itself wasn't an issue. By the way the pivot itself looks to be made of a softer material... can't really tell though.
As mentioned in my earlier post.. the pivot is a double male end with a hollow shaft.
I read about the different MRBS but up until now had only seen the asymmetric one on my 111.
So this is how the "Mickey Mouse" MRBS look like.
For a comparison with the asymmetric version...
"Stand-by Knife"... :) I think it carried over from the days where I really love stripping my weapon to clean... when everyone else in the platoon is cursing and wanting to send arms back to the armory.
Cleaned up the old grease (I doubt this one like most of my Shiro had ever been open up before since leaving the factory)...
A healthy dollop of "Anvil's no. 38"...
Rest of it will let the action speak for itself...
Prior to this I was using taped up flat #8 and #6-#7 bits to prevent
any gouging of the screws. Type of tapes and their thickness is an
exercise in trial and error to get that "right" feel. I think sometimes
we all go a little overboard trying to keep things looking perfect
and pristine. Then again, these are proprietary screws which aren't easy
to get replacements. So there really are good reasons to keep them in
good conditions especially if you plan on opening them up over the
years.
After disassembling a few Shiros rather carefully, I was wondering if it is really necessary to get the proprietary bits to fit those pac-man screw heads. For all the ones I have opened, they were easy enough without need of much force to twist and loosen things up. Don't think Loctite or equivalents are used on the screw threads of those mauled by my paws.
Hesitated on getting the older standalone driver bits and did not hunt
for those. Ergonomically speaking, those didn't appeal as there
is much chance of a slippage when using them. Perspective changed when a couple months back, the news of this screwdriver/pen was made official, together with the comments from people who know their Shiros. Not sure about all the Google Translation I've been relying upon but seems that officially this item is called the "Pen-Transformer" (Ручка-трансформер)
Opening with plain jane flat bits.
Some people have problems with theirs up but if its not new, then it's likely someone else might have opened up and while putting it back, adding Loctite as a measure to keep things from coming apart. I think it should never be done.
Except for the older generation pac man screws, which are smaller in diameter from an older F95 I have seen, the female screw is also hollow) most Shiro now have a female side that is flat.. There is almost no way to "grab" and create any kind of force in opposing direction if Loctite had been applied. Of course the usual methods like immersing in hot water etc can be applied. But...
Keeping the screws down sans Loc-tite.
When opening up my F95 that was bought used, I saw the remnant of those yellow cobbler glue which gets rubbery when dried. Reckon when applied to underside of the screw head and let dried.. it sort of create a thin "glued-on bushing" but it's only to one side. Put the screw in and tighten down.. it would have a suction/friction effect with the handle side to help things stay in place.
In my opinion it is a much better way to keep things together if ever needed though not the most aesthetically pleasing when u open it up. Then again all pivots of knives that are actually used get black and gunky over time anyway.
But whatever tools, it pays to take that extra care in case of accidental slip ups by having proper leverage and protecting interface where possible..
27,21 Asymetrical bearings on the Model 111 MRBS.
More significantly is the curving direction and hence the correct orientation
when putting things back.
Being a bigger knife, it doesn't see as much carry time. Aka less chances of idly flipping and closing on the couch.
While it doesn't bother me too much that it does not drop as fast and smooth as my other Shiros, again it was curiosity that got the better of me like the last take down on the Banner F95.
Anyway after brunch today...
The 111 here has pretty tight tolerance on every movable part. The construction is also quite unlike most other Shiros I have taken apart so far.
Yup, little things like this "holder" to neatly line up the screws are important to me. Even while working on things, a clutter free environment is always a priority.
From the marks left behind on the blade side, it would seem one of the row is barely touching. Still with the remaining 14, it's pretty sufficient. Interestingly its the stepped-in profile on the lock face near the detent ball...
An internal stop-pin design but with a 1/2 and 1/2 channnel. the force of the stop pin located on the plate would still be mostly on metal to metal contact. Not smacking into carbon fiber. Strong as CF are but withstanding forces against their grain isn't their strong point.
... and the reason for the lock face shape. To interface with what's on the blade. Not really new for the 111s, just something I have not noticed till now.
Other than curiosity about the innards, I have always wanted to open this up and see if it can be tuned closer to the feel on my other 111.
The detent is a little stronger on this. Closer look reveal that size of detent ball and location are indeed different. When at lock up, it can be seen the detent is a little higher up as well. A little mental gymnastic of lever-load-pivot-fulcrum, it isn't hard to see why and how all these made a difference now.
Top: 111 MRBS, Bottom: 111 washer
Detent ball size not too apparent but the 111 mrbs one is larger with more exposed area. A smite higher which together with the position (higher up near the recessed area on blade) makes it a little stiffer but the multiple bearings no doubt aids in the centrifugal force when firing the blade open. The washer 111 on the other hand is a well tuned piece of finery that locks into position with an almost surreal sureness. It has to be felt in real, words are just insufficient. To this day, honestly i prefer this over the MRBS 111.
Couldn't help to hold up to check out the milling on the retainers. Compare to many caged retainer bearings on the market, well...
The tight tolerance on the non lock side bearing tells me a few things.. First there is a sandwich plate (I reckon its titanium) between the bearings and the carbon fiber face. The tightness made it not possible to remove the retainer and balls. At least not with the tools at hand now. Still trying to figure this one. So it was cleaning up as much before repacking between the crevices left between the ball and retainer grooves.
A big question in my mind has always been whether it is just the balls that rotate or its both that and the retainer revolving when a blade is fired. A question spurred during one of those blade gatherings by Koji-san. I've always maintained that it's the balls that moved, not the retainer. Any movement in the retainer would only be rather slight.
It is in this regard that I have always tried to re-pack lubes like I would in load bearing applications on other stuff. Trying to get the viscosity right with grease or mix that will "stay" and not be too easily forced out over time which happens to too viscous a lube.
Not a fan of oil lubing alone. That's only something reserved for race day preps on bikes where every microsec counts. Only to be repacked again afterwards. Oil makes everything fast but noisier and will wear things out faster
Anvil's F(x) 38 "Wasabi-Mayo" : 70/30 concoction of Shimano Durace Ace Bearing grease and Chris King Spline lube + a couple drops of ZX1 Micro Oil.
Alright my secret is out. There's a lot of other nice slick lubes out there. Ain't much of a rocket science. Just happen that this works for me on most ball load bearings for a fine balance of things normally associated with such applications.
Let's quit the ramblings and move on...
Getting the amount right and not making a mess is almost a Zen pursuit these days. Having to wipe down is so errm "un-perfect" :)
While putting things back together, it just struck me that if the next 111 outers come in a combination of titanium and carbon fiber with some hollowing out and or 3-D profiling (leaving part of the liner/ back spacer exposed etc?) that could make it pretty rad looking. Ok idea shelved for potential custom project.
It flies open and the closing was pretty smooth but.... *grrrt*, *grrrk* it goes ever so slightly. Contaminants. Could have let things be for awhile but curiosity got the better of me. Just got to see the insides :)
Anyway time for another grease lube combo experimentation but first,
Yup proper tool for the job, still on the side of caution... masking tape wouldn't hurt. Snug fit, easy open for both screws.
Bearing retainer for these newer F95 is different from others I have opened up before, Cammie and CF in-lay F95... those had a bevelled retainer and distinct race grooves. Race on handle sides for this one is flat.
Same 17 bearings per side though...
MRBS retainer seems to be flat and I know of a few F95 out there were using MRBS and was wondering if someday I can get my hands on spare MRBS -- will they fit here?
and...
Dodgy Caliper Work: Vernier is the defacto tool to reach out for but I always wanted a micrometer since playing with one as a kid in the science lab... time to go e.shopping again.
Cleanup...
Packing it back up...
Magnetic bits is a blessing to have
Action...
Update: 2nd Banner Takedown and comparison
Before going into the comparison, here's the video to compare with the above one.
Yes yes, you are not seeing double..it's 2 different Banner out of the 70 for this special commemoration. This one was for my good friend Koji-san. Which as usual of him these days, he just passes it to me for tuning even when knife is brand new...
Now this F95 Nudie would be an older SRBS. How do you tell when 2 looks pretty much the same from the outside? The jimping? the blade steel? Nope. those are just different options available (except for the stepped in swedge/ jimping which has become a Custom Division only signature).
Ok here's the diff... or as far as I could tell and handled, apple to apple, older SRBS (traced that back to early 2014 and before) has a beveled retainer and grooved race as per pic on left column below. The flat retainer and flat race were seen on newer knives.
"Theories" as to why they may cause the differences in the action seen in the vids?-- Guess I'll leave that to another day...
Once again, the time has come for another take-down. While not adverse to prying stuff apart, still with a little rare gem like this... gotta admit I do feel a little apprehensive at first.
Ok I know many people are gonna wince.. but hey, a knife is a tool. Tools need to be maintained over time. There is nothing worse than leaving them in less than optimal condition.
Tested all the screws. Great! Nothing binding. No elbow grease needed... Look again, nope, not the usual T6 and T8 torx but it uses chamfer heads M2 and M2.5...
A grand total of 25 parts.
Not much dirt but I reckon it has never been taken apart... the original factory lube was getting a little viscous, hence the less than stellar smoothness which prompted tonight's dis-assembly.
Easter Egg!
Would never have known another "100" was engraved on the insides of the handle as it is neatly hidden by the Micarta backspacer when assembled. This isn't the usual alphanumeric to identify the handles on their respective CNC batches...All the engraving on this knife is much thicker deeper.. and very well defined in a different font.
Why the extra hidden "100"? Well I could only guess. In fact is "100" even what it says it is..... there are errm "stories" and mysteries surrounding the Dark, rare enough that these blades are seldom seen and even rarer the information surrounding the numbering and actual number of pieces.... :)
The attention to detail, the insane amount of contouring on this small little knife is what make it one of my favorite. No flashy Timasus, mother of pearl etc.. a knife designed and made where every bit can be felt. This is one knife I actually close my eyes sometimes when holding it in the hand to savor like fine wine and good cigar.
Have always thought the early generation clips were just flattish and bent into place.. but no.. underside is actually contoured as well.... most probably to add to the springiness of the clip. kinda like the recess of the lock portion.
Female side of pivot screw has some pretty nice and tight tolerance threading up all the parts
Let's start off this new blog of mine with some edged related content before I port over past articles from my other sites.
Twas mail-call time last nite. Nope not knives but my anything-and-everything Shiro package, at Koji-san's abode.
Finally! Yes both the Nasgul holster and one of those really nice big SiDi designed radiator bead. Ok throw in a couple of those factory bear buttons too.. Must say, most time I'm not big into fancy beads and accessories. Reckon this is indicative of my obsession with me no. 1 favorite knife brand.
Of course paranoid me took the opportunity to order extra screw sets. Has to be the most expensive screws I ever paid, for whatever things that needed screws, but... how often do one get to hoard some of these spares. Especially if like me, you don't stay in Russia eh!
Really nice...
Not gonna go on and on.. let the pics speak for themselves
Of course when more than one knifenut is in the house.. everyone will whip out their latest acquisition(s)...
Last night was no fancy dandy full customs... no, we old men are a little past that now. Appreciation of things well designed and made even if its productions. A Spyderco and a Benchmade. Both designed by the late Bob Lum.
Certainly no photoshoot session.. just some quick phone cam snaps. Have to gather the blades for better shots soon but here's another that hopefully do some justice
Spyderco Lum Chinese Folder, Black Almite Coated handle, ZDP-189 Benchmade 746 Onslaught Limited Edition Shot Show, CF. D2.
My Spydie-Lum ZDP-189 is certainly a class one slicer. Thin blade, right edge shape, great ergo and all. But the BM Shot Show edition packs some serious sweetness within the entire knife. Both knives are smooth as smooth can be. Another instance where it makes me not think about flippers. With the kind of guide and slide opening action they are just in a category of their own.
Appreciation of fine things over and out came Koji-san's well worn and used EDC... Oh.. rust, tiny half rounded T6screws for bolster hiding the pivot pin... I tried on the spot but to no avail and the rust was really bad even if they were just peeking out of the steel liners...
This morning, armed with my better Torx bits, rounded screws were no match for experienced wrench hands :)
For a small little knife this sure has a lot of parts. 35 bits and pieces in total!
And this was the state of affair before cleaning up
I'm not sure if chocolate is really good for lubing. I'll stick to true and tried.. Chocolate in my mouth and Shimano bearing grease for the job at hand...
All rust and stains gone from metal. I washed the micarta back to its's original light tan but it's so easily stained with the slightest grease or even by just holding.. I decided to "dark coat" it for practical purposes.. Hope Koji-san doesn't mind :)
Oh yes, he "100% pre-paid in advance" last night with a bottle of uber awesome homemade sambal chilli.